Automation with Message Brokers
Today I am going to talk about how I built my home automation projects.
![]() I recommend first reading both parts of my posts on ZeroMQ and RabbitMQ message passing to introduce concepts and core implementation in my projects. It will make this post much easier to digest.
I recommend first reading both parts of my posts on ZeroMQ and RabbitMQ message passing to introduce concepts and core implementation in my projects. It will make this post much easier to digest.
Foreword
![]() “Automation” in this context is my specific use of the technologies discussed here to solve my own automation challenges. At present, there is no integration with sensible frameworks like openHAB or Home Assistant in my projects. The goal behind these projects was a learning opportunity by employing some specific technologies and my opinion on design. The parts you may find useful are touch-points with third-party libraries like Flask, ZeroMQ, RabbitMQ, SQLAlchemy, Telegram’s (well documented) Python Bot, Python libraries like
“Automation” in this context is my specific use of the technologies discussed here to solve my own automation challenges. At present, there is no integration with sensible frameworks like openHAB or Home Assistant in my projects. The goal behind these projects was a learning opportunity by employing some specific technologies and my opinion on design. The parts you may find useful are touch-points with third-party libraries like Flask, ZeroMQ, RabbitMQ, SQLAlchemy, Telegram’s (well documented) Python Bot, Python libraries like asyncio, and Docker containerization because seamless behavior comes after much trial and error.
![]() While writing this post, it became apparent that I need to actually discuss more about my choice of the ZeroMQ and RabbitMQ message broker frameworks. MQTT is much less controversial because it is better known and effectively ubiquitous for IoT information exchange. In a future post, I’ll discuss how I came to use ZeroMQ and why I augmented it with RabbitMQ when ZeroMQ has a perfectly robust protocol for exchange over the wire.
While writing this post, it became apparent that I need to actually discuss more about my choice of the ZeroMQ and RabbitMQ message broker frameworks. MQTT is much less controversial because it is better known and effectively ubiquitous for IoT information exchange. In a future post, I’ll discuss how I came to use ZeroMQ and why I augmented it with RabbitMQ when ZeroMQ has a perfectly robust protocol for exchange over the wire.
![]() This project really just focuses on functional relationships between the components of this system, and at a relatively high level. While this is a useful complement to the projects, there is little detail about how robustness is achieved in the implementation. I will write a separate post about this in future.
This project really just focuses on functional relationships between the components of this system, and at a relatively high level. While this is a useful complement to the projects, there is little detail about how robustness is achieved in the implementation. I will write a separate post about this in future.
![]() While also technically an implementation detail, visibility and monitoring deserves its own discussion since they build on the messy realities of imperfect dependencies (software and hardware). This topic will definitely have a dedicated post in the future.
While also technically an implementation detail, visibility and monitoring deserves its own discussion since they build on the messy realities of imperfect dependencies (software and hardware). This topic will definitely have a dedicated post in the future.
![]() If you want to skip straight to the implementation, you can visit each of the projects in Github with fairly comprehensive README which includes some additional detail about the class relationships.
If you want to skip straight to the implementation, you can visit each of the projects in Github with fairly comprehensive README which includes some additional detail about the class relationships.
The Problem
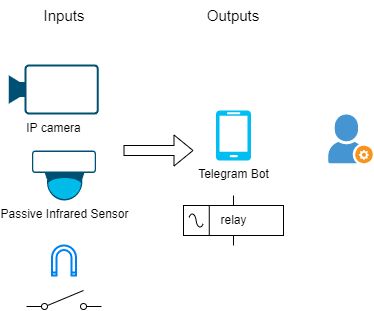
The problem being solved was to use off-the-self software and hardware to build a home security appliance. As a hobbyist, I wanted to spend the least amount of money to get something functional. I had some Raspberry Pi, Arduino, ESP8266 and ESP32 boards in my electronics parts and so the rest was “just” putting it together with some inputs, such as IP Camera snapshots, passive infrared (PIR) sensors and standard magnetic reed switches. In terms of user experience, I wanted to have a web dashboard that would work on either mobile or desktop. I haven’t yet had a need to develop mobile applications for this purpose but I was aware that Telegram supported a bot API which provided a good basis for basic control as well was a notification mechanism richer than simple (and expensive) SMS.
User Experience
To reach the dashboard, I needed some kind of reverse proxy. I quickly discovered the ngrok free-tier. The main requirement is that I did not want to expose an Internet-facing virtual-server port on my router and with my ISP moving to carrier-grade NAT a direct route to my router IP was no longer possible. Using the recently published ngrok client for Python, the ngrok tunnel is easy to enable for your favourite embedded server, which I have started to incorporate into another project. The ngrok free-tier generates a new, unpredictable tunnel DNS record but the local ngrok management port provides an easy way to determine this for which I have a thread called CallbackUrlDiscovery. The discovered URL is then forwarded to me over a notification message. I’ve noticed that ngrok now offer a single, static DNS name for free which makes it better for use with a DNS alias.
Incidentally, Tailscale solves this problem in a way that also covers other common networking challenges but I’ll leave a deep-dive into Tailscale for another time. There are many examples online about how it can be used. Suffice it to say that I’m a huge fan of Tailscale.
The dashboard itself makes use of a combination of Python Flask to serve up pages, with Bootstrap and Font Awesome for styling with relatively little effort.
Persistence
Beyond the statically deployed configuration, the project needs to be able to store some basic configuration for user preference, such as which devices were enabled, i.e. could generate trigger events. I had previously used a combination of SQLite and AWS DynamoDB for configuration management but I’ve settled on SQLAlchemy on SQLite for configuration with a cron job to create periodic backups of the database to AWS S3.
Architecture
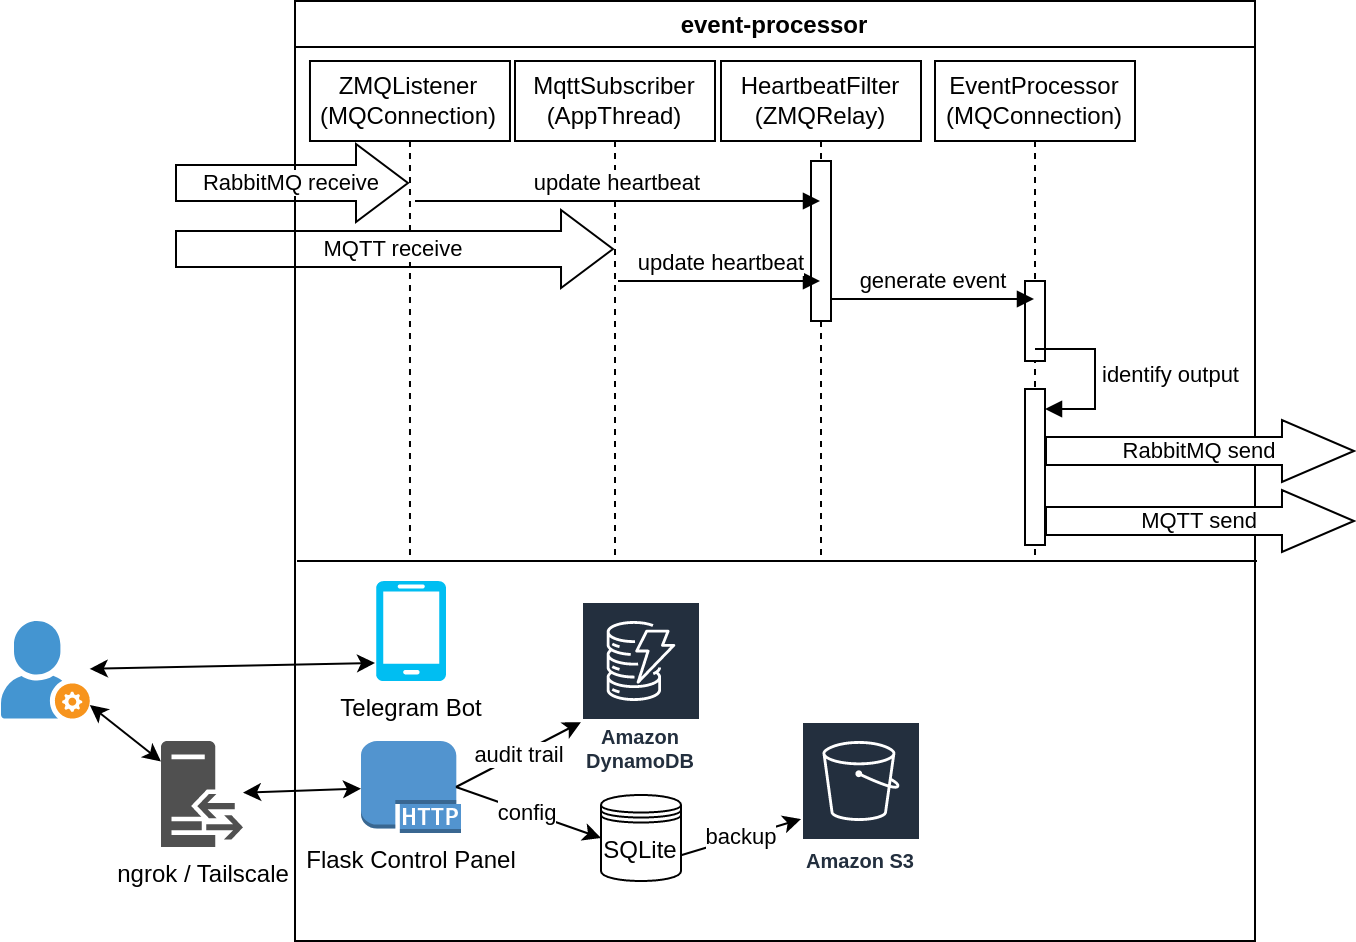
The diagram below is a bit of a mashup of architecture and sequence diagram. My aim is to introduce the most important classes responsible for message handling and event processing in my Event Hub project. The project includes another useful diagram in the README to distinguish between classes for this project versus base classes in my library. Other classes and methods not shown here are mostly self-explanatory with a code inspection. An instance of ZMQListener (extends MQConnection) is responsible for handling incoming RabbitMQ messages and an instance of MqttSubscriber (extends AppThread) does the same for MQTT messages. All the devices in my project are configured to send both trigger messages and heartbeat messages on some fixed interval. When either of these instances receive a message, they pass through an instance of HeartbeatFilter which extends a delegate I created called ZMQRelay. This uses ZeroMQ for sharing data between application threads. Once the HeartbeatFilter has associated the message with an existing device to keep track of devices last seen, the message is then forwarded to the main application thread in an instance of EventProcessor which extends MQConnection to publish trigger decisions back to the devices that host outputs like controlling security appliances.
My choice of ZeroMQ dates back to some of the earliest work one on this project and deserves its own future post. For the purposes of this discussion, I want to show briefly how the message passing is actually done between threads of the above sequence diagram. Consider the diagram below which focuses on just the job of processing MQTT events.
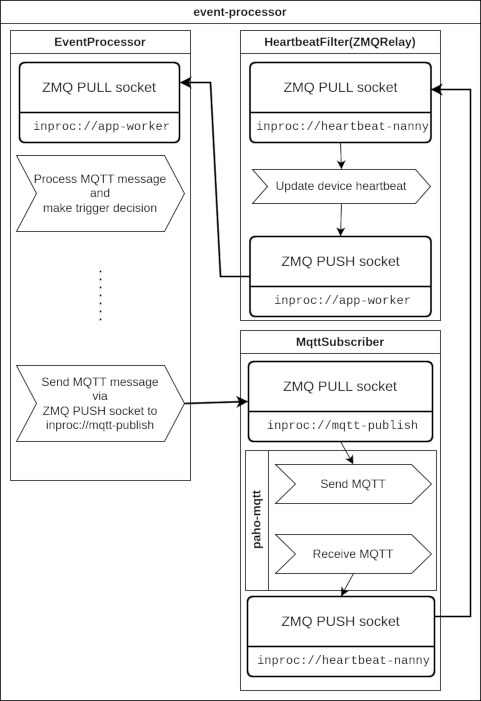
These application threads use two types of ZMQ sockets for inter-thread communication. To receive a message from another thread, the EventProcessor instance creates and binds a PULL socket type with a special in-process address of inproc://app-worker, a label that uniquely identifies the message sink to other threads. Anything sent to this address will be forwarded to this socket, using the semantics defined a the PULL socket type. For the purposes of this post, we’ll treat a PUSH socket as a sender and a PULL socket as a receiver. All messages sent to the main application loop in EventProcessor arrive through this PULL socket. In this MQTT example, the EventProcessor also creates and connects a PUSH socket with an inproc address of inproc://mqtt-publish. Can you guess where messages sent on this socket go?

That’s right. Any thread that pushes messages to this address will arrive at a corresponding PULL socket created and bound in the MqttSubscriber instance which contains the concrete MQTT Python client implementation. MQTT messages arriving to the client from the broker are forwarded to another PUSH socket addressing inproc://heartbeat-nanny ![]() . As described above, this gives the
. As described above, this gives the HeartbeatFilter the chance to update the sender’s heartbeat and then forward it on to EventProcessor addressed at inproc://app-worker completing the event life-cycle ![]() .
.
One of the features of ZeroMQ is that you don’t need more code to sequence messages between threads, this is done for you. It sounds complicated but when an application becomes non-trivial, I found that it takes a whole class of problems off your attention. More on ZeroMQ in a future post.
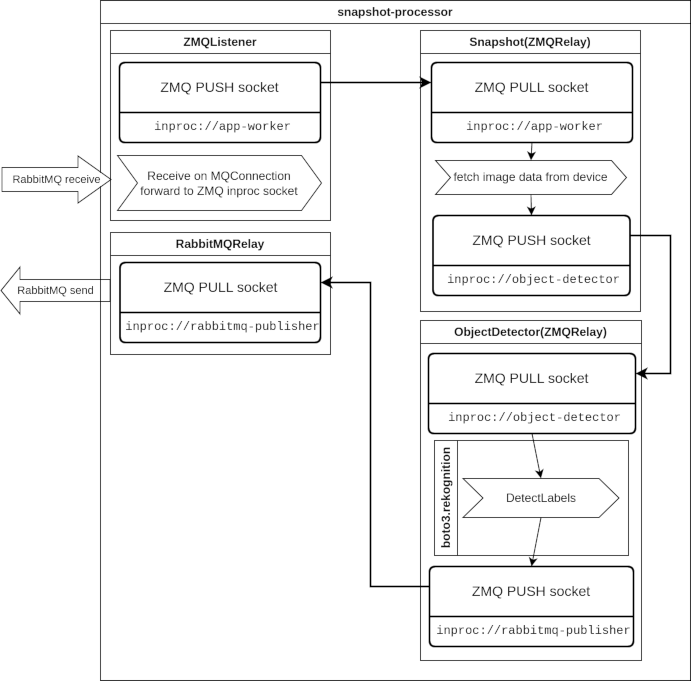
Next, we move onto the next project for IP Camera snapshots with another mashup diagram. This project contains an embedded FTP server in order to host snapshot pushes from an IP camera. If camera-sourced motion detection is enabled, each camera is configured to push updates to a path on the FTP server that uniquely identifies the input. Alternatively, a snapshot can be fetched from the IP camera on demand, if this project receives a RabbitMQ control message. In either case, image data is stored on a local data volume for archival to Google Drive. For either retrieval method, image data can be sent for object detection. I’ve experimented with a variety of options, including inference on the Jetson Nano development kit. The current implementation makes use of AWS Rekognition for object detection. More details can be found in the project readme.
Similar to the Event Hub project above, the message processing chain is illustrated in the sequence diagram. This shows how a trigger message that arrives on an instance of ZMQListener (extends MQConnection) is forwarded to a chain of ZMQRelay instances, one for creating the snapshot (Snapshot) and one for object detection (ObjectDectector). The benefit of using the ZMQRelay pattern is that the application code need only deal with the task at hand with message passing details and error handling is hidden. After object detection is done, the output message is forwarded to a RabbitMQRelay (extends AppThread) to send the RabbitMQ message on the network.
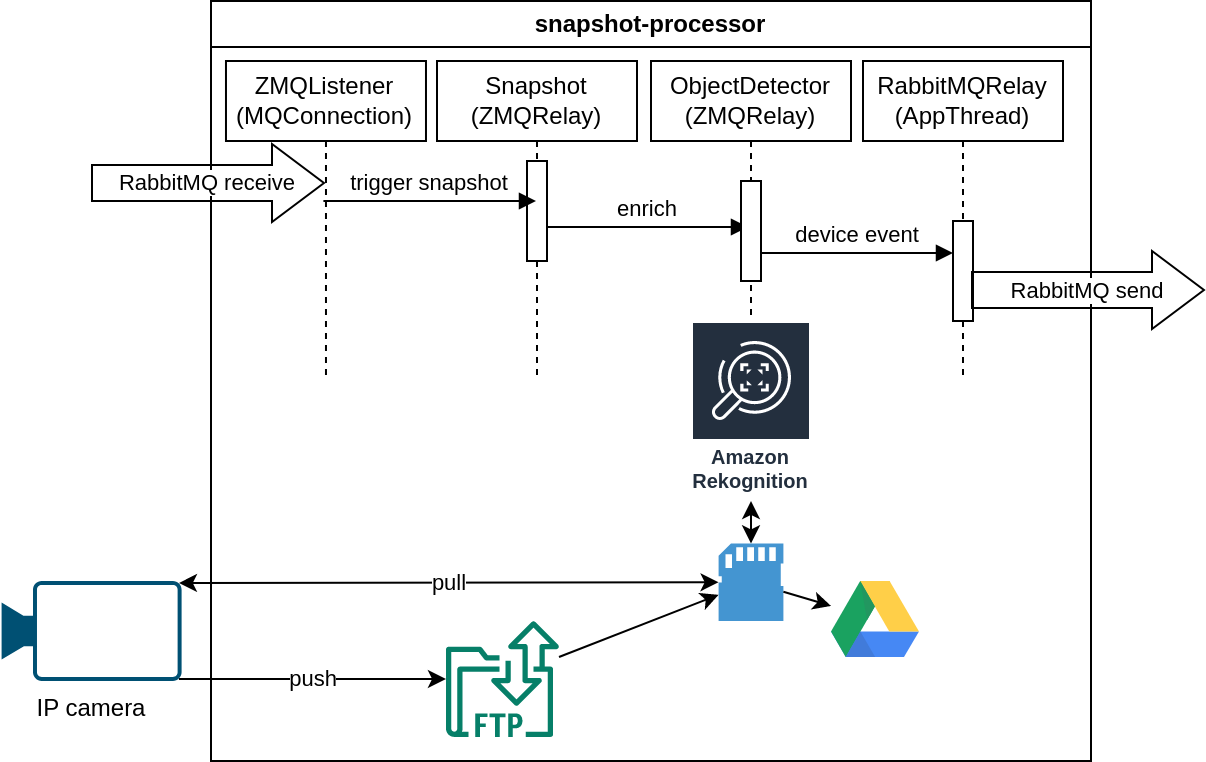
The next diagram again illustrates the message flow between the application threads using ZeroMQ. A RabbitMQ message arrives from the network to and instance of ZMQListener which is rather confusingly named because it actually receives RabbitMQ messages and relays them to the application code via a ZeroMQ PUSH socket to the IPC address inproc://app-worker. The implementation for this can be found here. The event data then goes through the ZeroMQ chains Snapshot, ObjectDetector and finally RabbitMQRelay which then dispatches the output message to the RabbitMQ exchange.
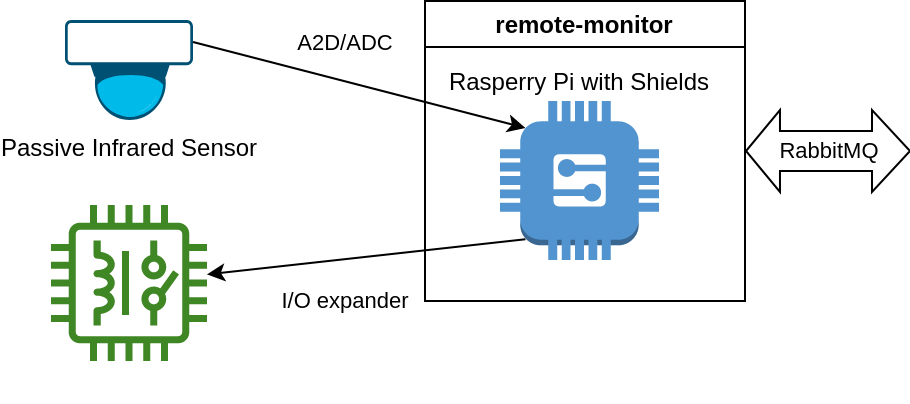
Another piece of this system is the ADC and I/O expander on Raspberry Pi. Apart from all the software and deployment scaffold, this is a relatively simple electronics project. You can find some additional information in my previous post about additional use of Balena Cloud for deployment and the hardware choice.
A few other ESP-based projects not shown here can be found in my previous post which discuss the MQTT inputs and outputs.